As we round the corner on the weirdest year (ever?), with just under 10 days until Christmas, I wanted to share with you just a few last minute crafts. These are great gifts, great things to do if you find yourself in need of a way to connect AND kill some time, and are super easy. Most of you will probably have the majority of these craft items already on hand, too, thus lessening any additional burden brought on by last minute shopping. The best part? You really don’t even need to be crafty to pull these off–I promise!
Here’s the list of fun, easy, cheap, last-minute Christmas crafts. Most of it you probably already have, as I said, or you can easily improvise–but if not, I included affiliate links to the items (t no extra cost to you–you can view my disclosures policy here). BUT WAIT — you promised me a recipe (spoiler alert: it’s Stromboli)! I’m saving the best for last!

Salt Dough
Salt dough ornaments, probably the oldest and easiest hand-made ornaments in the book. They’re a favorite for all ages, and such a fun keepsake. Bonus: it doubles as sensory play; what’s not to love?
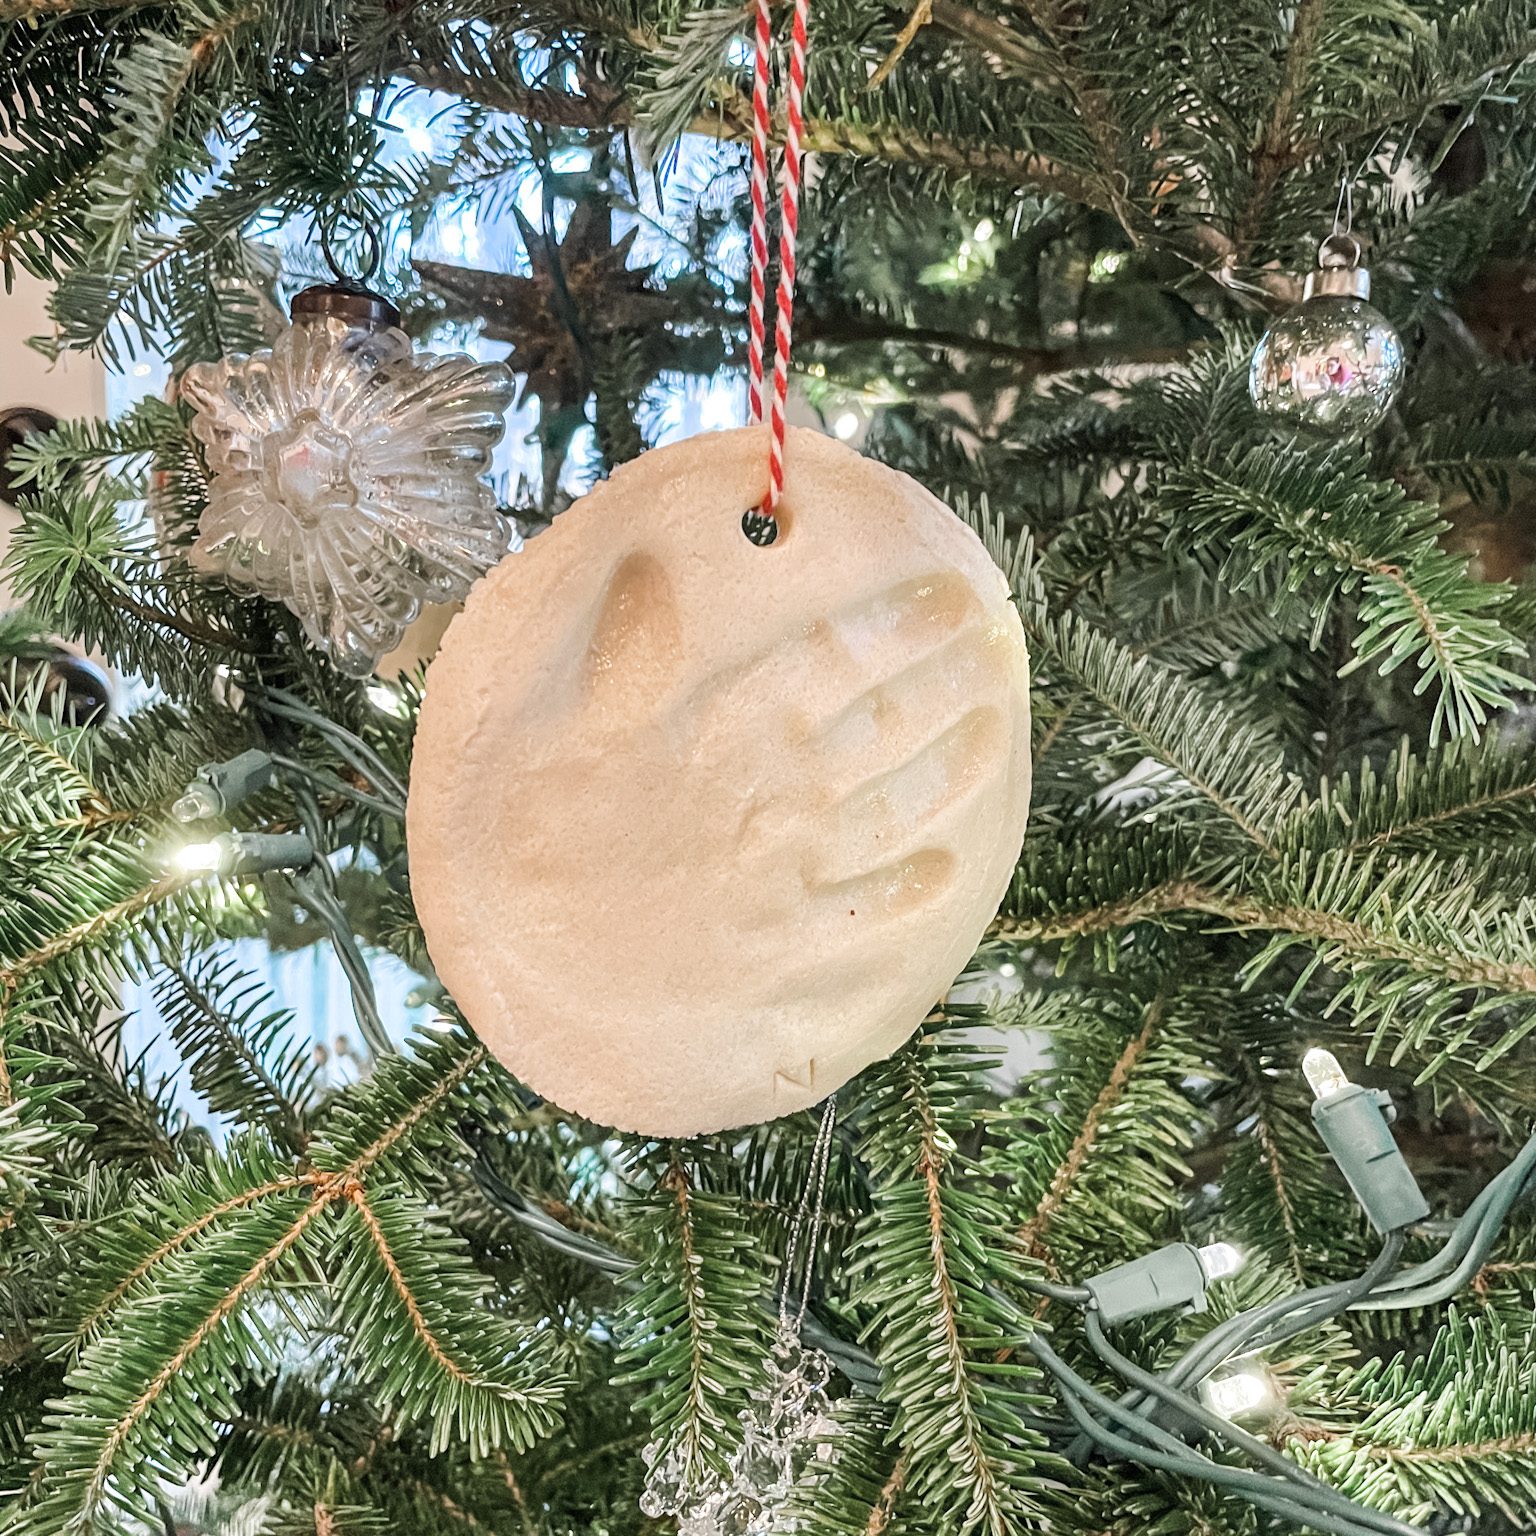
One part salt, one part all-purpose flour, and one part warm water. Knead (and add more flour/water as necessary to achieve the desired consistency), roll, press, done! I let my kiddos play with it for a bit as I’m getting my supplies ready to take their hand prints: a straw (to make the hole), a cookie cutter or wide-mouth drinking glass (to cut the circle, because let’s face it, I need the help), and a toothpick or small knife (to mark their initial/year as desired). It can be sticky and dries crusty, but since its just flour and salt, the cleanup is truly very easy.
Salt dough will air-dry in 5-7 days (I flip it every day or so) a creamy beige color. You can speed up the drying by placing them on a cookie sheet or parchment paper for 2-3 hours (or more) in a low-heat oven (150-200 degrees), flipping every so often. They will get slightly more tan if you dry them in the oven. The thinner you roll it out, the less dry time (and the lighter they will be when you hang them on your tree).
I recently learned that if you use some white acrylic or craft paint in the water part of the mixture, they will dry a little more white. You can also paint them, but I don’t recommend doing this until they’ve dried for several days (I made this mistake a few years ago and when the dough fully dried underneath, the paint began to chip off). This year, once my ornaments were completely dry I sprayed them with polycrylic (clear-coat).
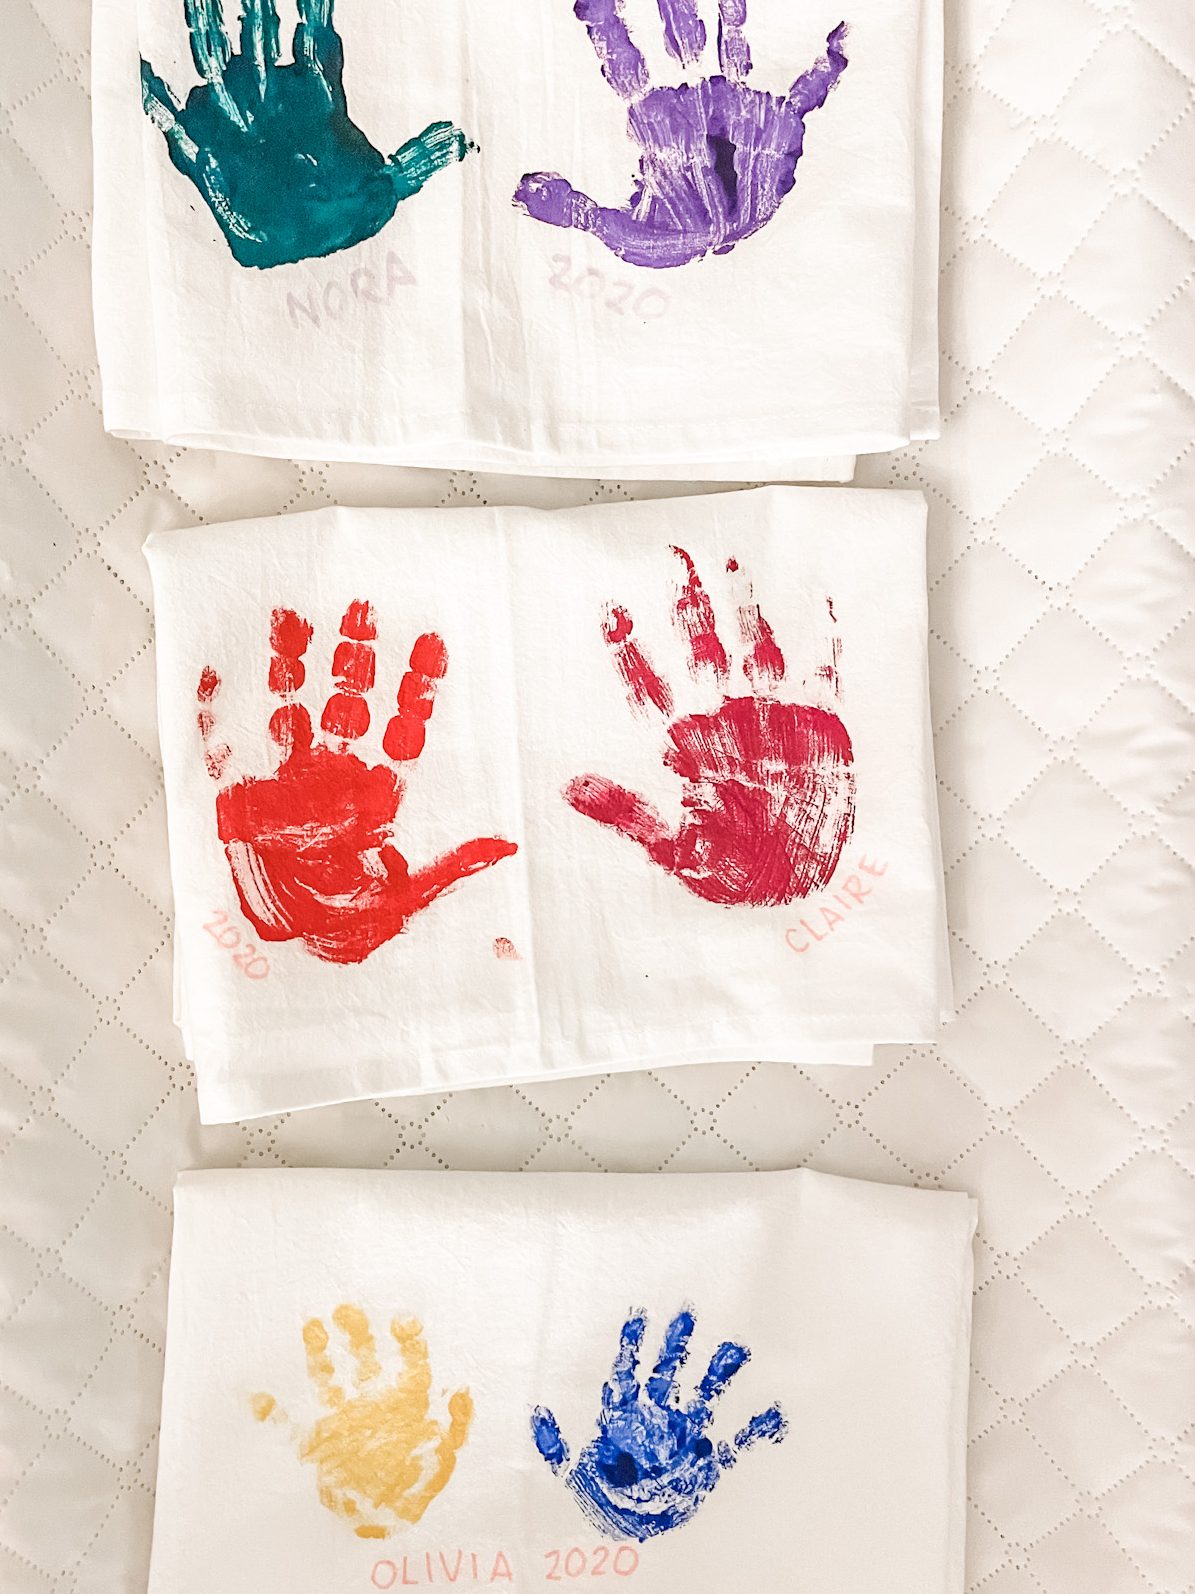
The fun part about the salt dough is you don’t have to do handprints, you can push some leaves or pine cones into them too for some fun festive ornaments or even use them as gift tags! We have made hand-prints for each kid every year for our own tree, and one for each set of grandparents.
Wood Slices
My sister-in-law asked me to make some ornaments, and honestly, it’s just so easy (and so on brand for 2020) that I had to share. I got a pack of these wood slices from Amazon (10-pack for $14, but honestly, you can use ANYTHING, even a salt-dough circle from above). Don’t like plain wood? No problem–use whatever craft paint you have lying around, or even just color it in with a sharpie, and bam, you have a nice homemade ornament.
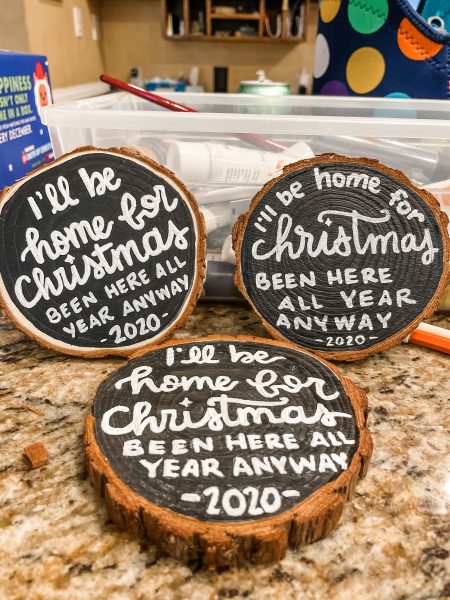
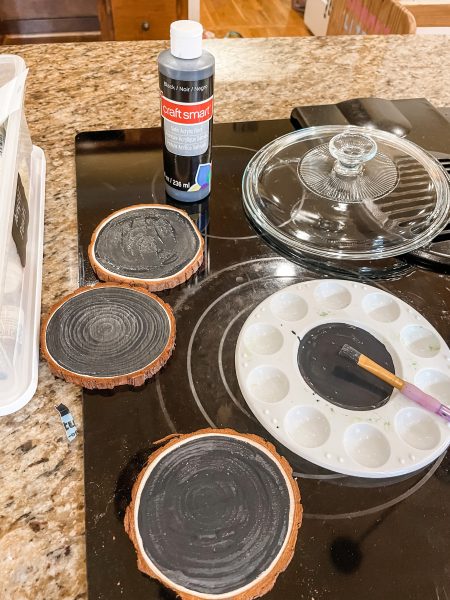
Print the image below, color on the back with pencil or chalk, place it on your piece, and trace. Cheap and easy template! Fill in your tracing with a Sharpie, paint, or give it to the kids to color. (Don’t wanna write anything? That’s cool too, trace your kiddo’s hand or footprint just as easily!)

Footprint “Mistletoes”
When my oldest was born, I looked for a Baby’s First Christmas ornament keepsake, and couldn’t find one I liked (ok fine, I didn’t look that hard). I ended up buying these 4″ glass ball ornaments and making her footprint on them with green craft paint. It was so easy, and has since become a tradition for each kid (and bonus: it was a great gift for the hard-to-shop-for grandparents who already have everything!)
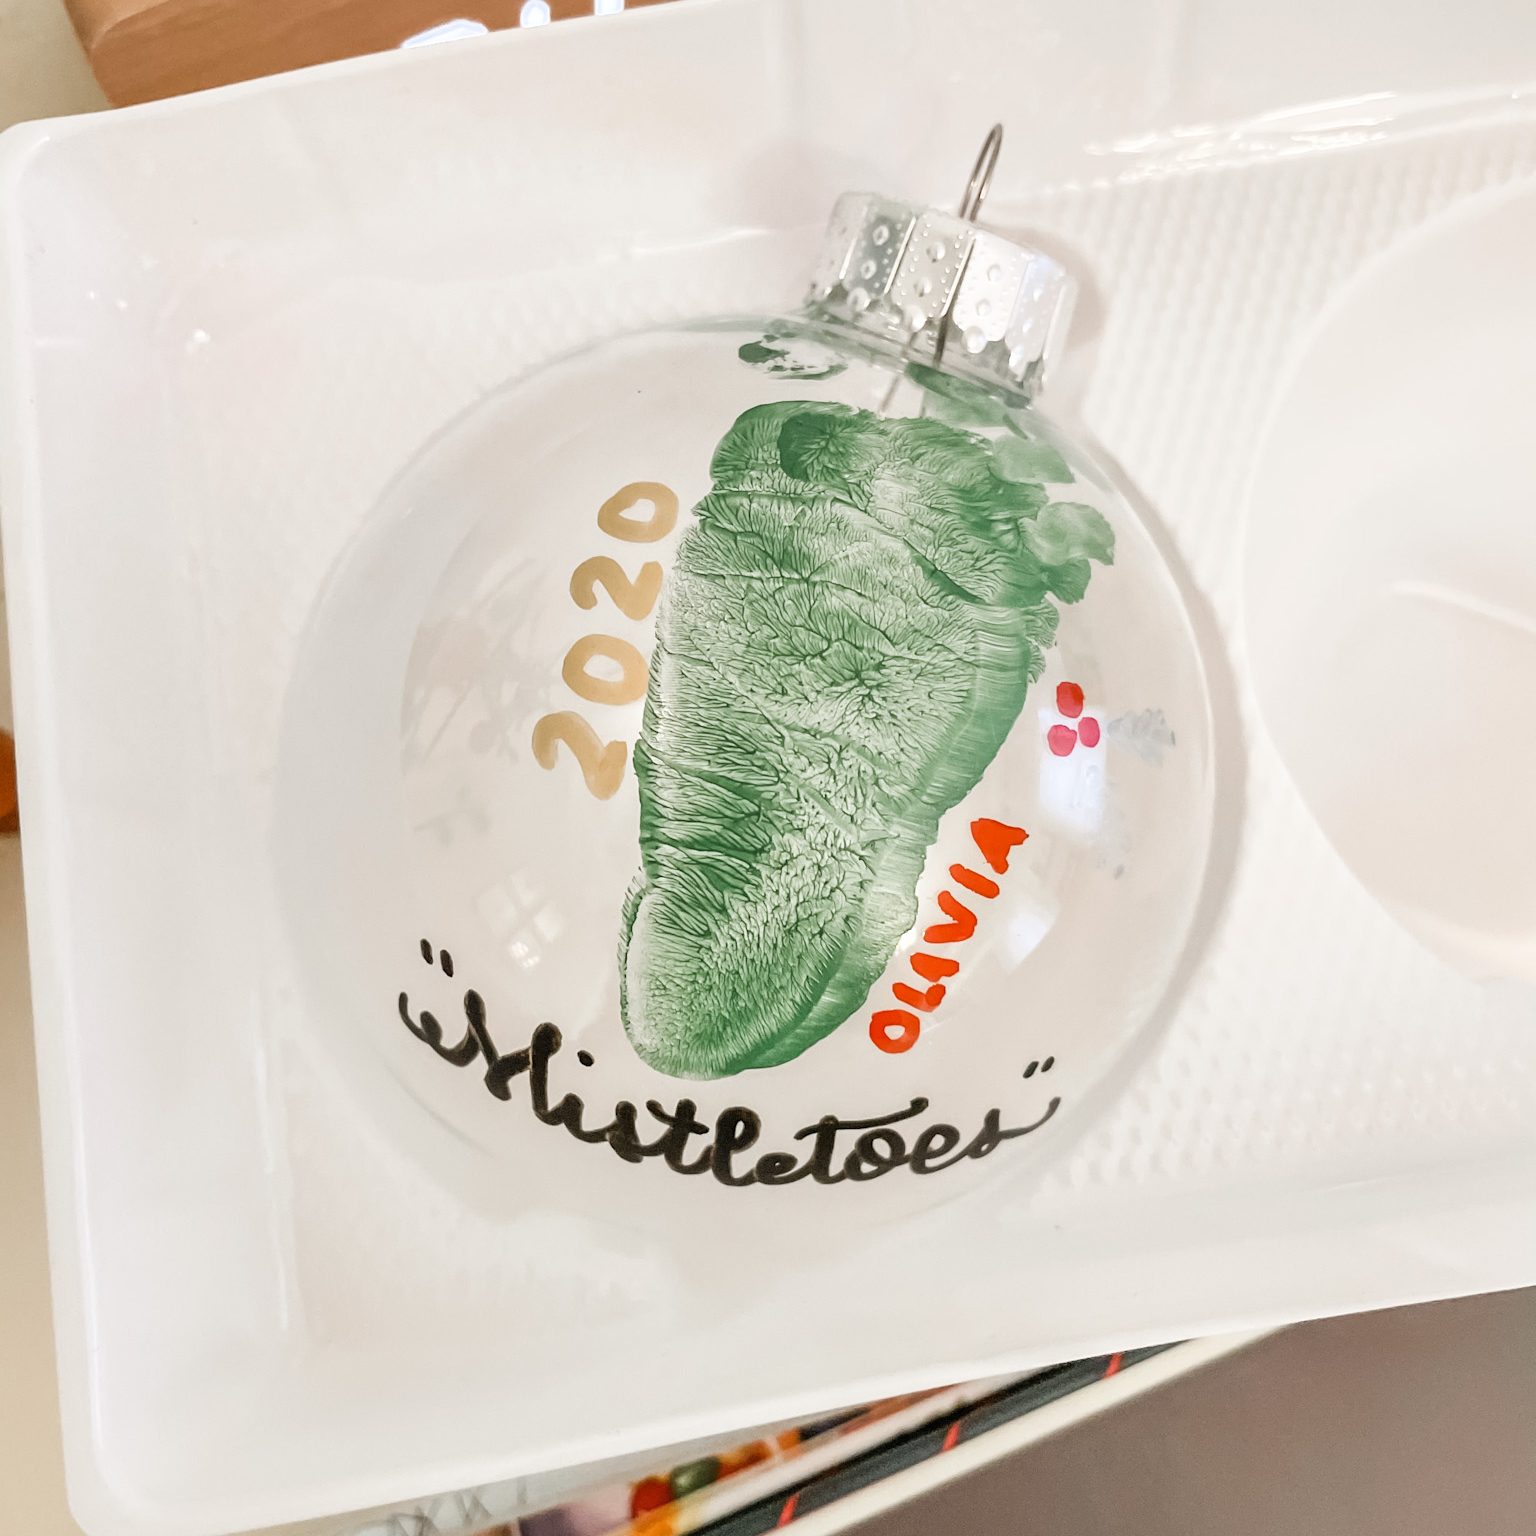
Paint their foot (water color, acrylic, craft, fabric paint–seriously, whatever you have works fine). Don’t have paint? Just trace around it with a marker. Let it dry, write their name, the year, and “mistletoes.” The great thing about that fun pun is it doesn’t even HAVE to be their first Christmas (it’s just that baby feet fit better than big kid feet, but be creative! Maybe this year the whole family puts their toes on an ornament. It’s 2020, there are no rules now!)
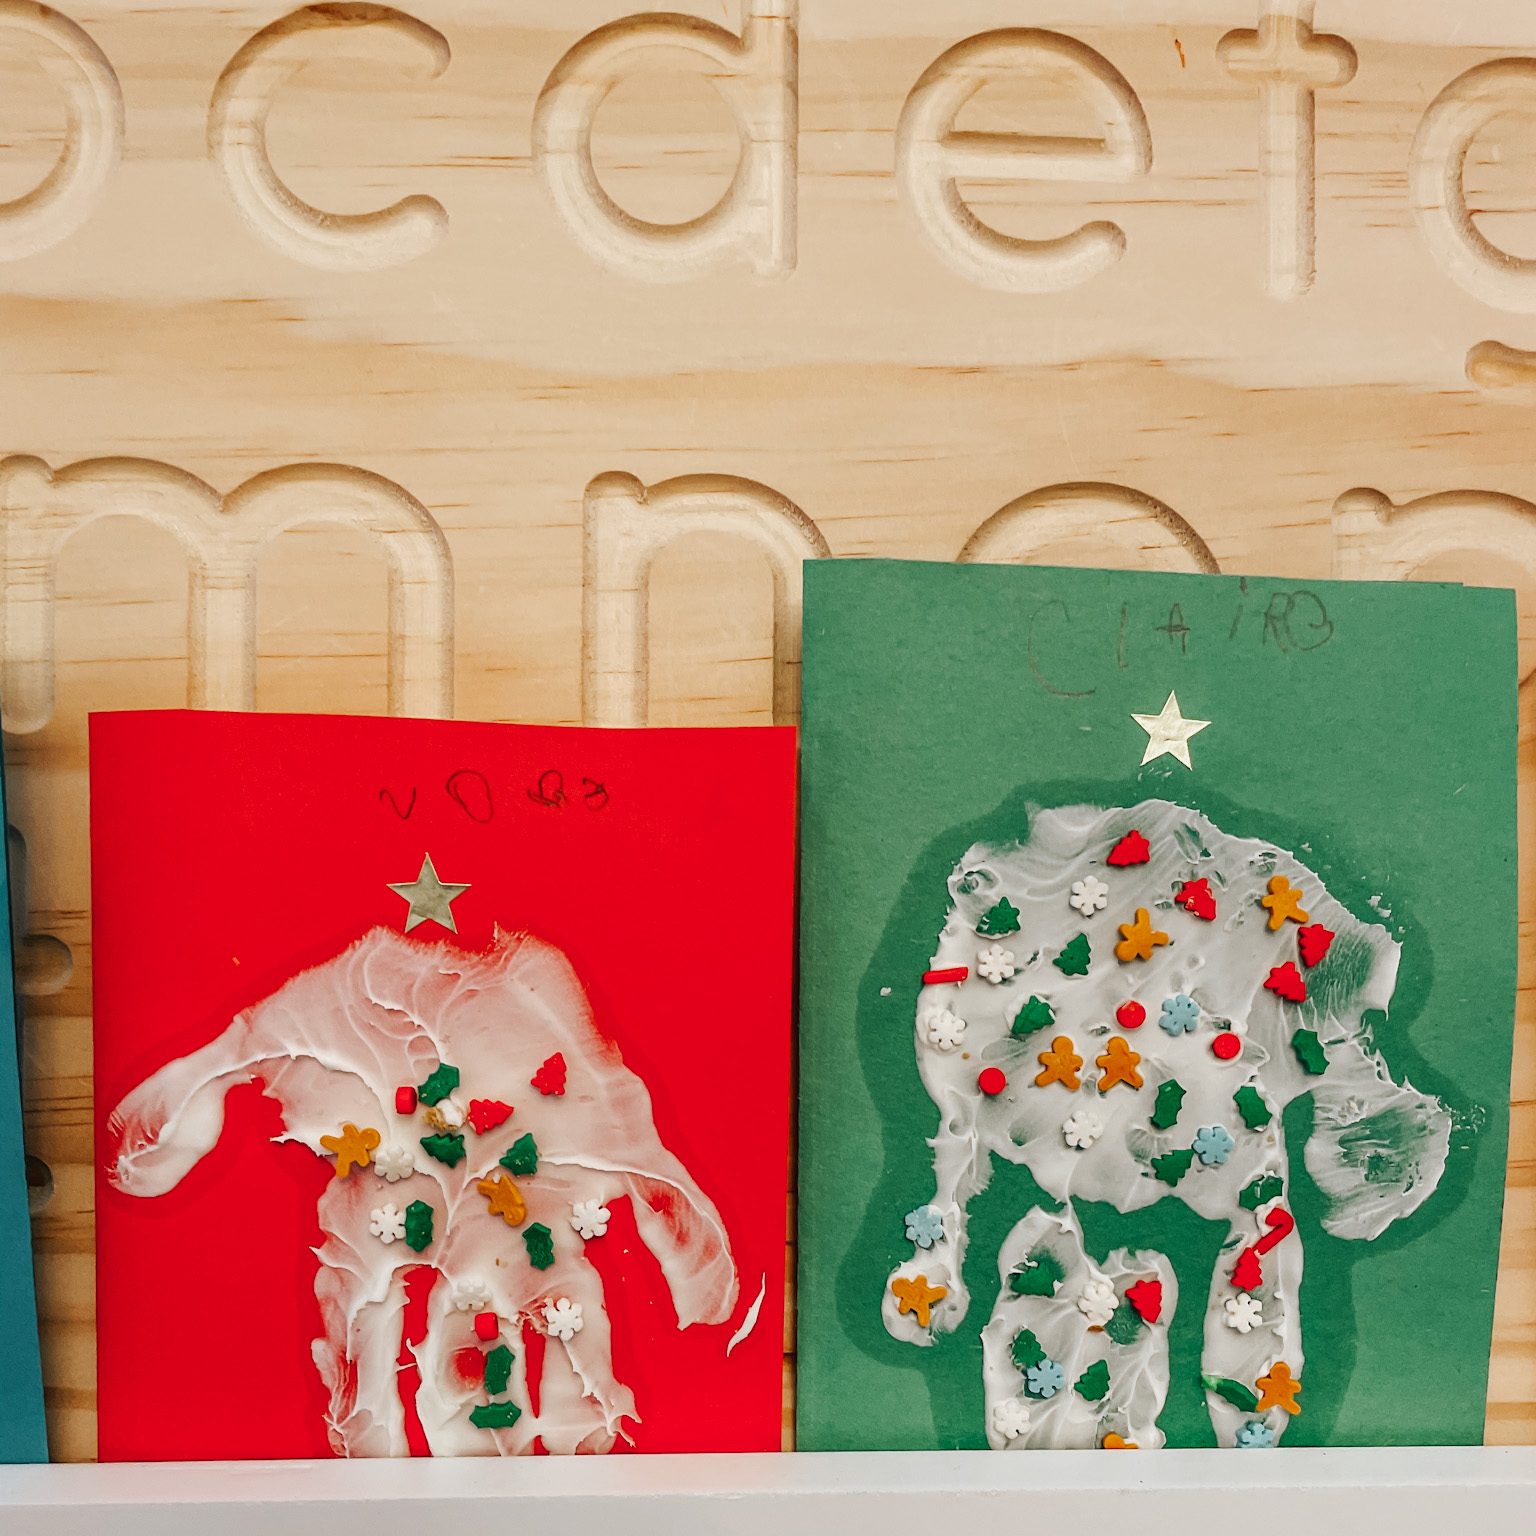
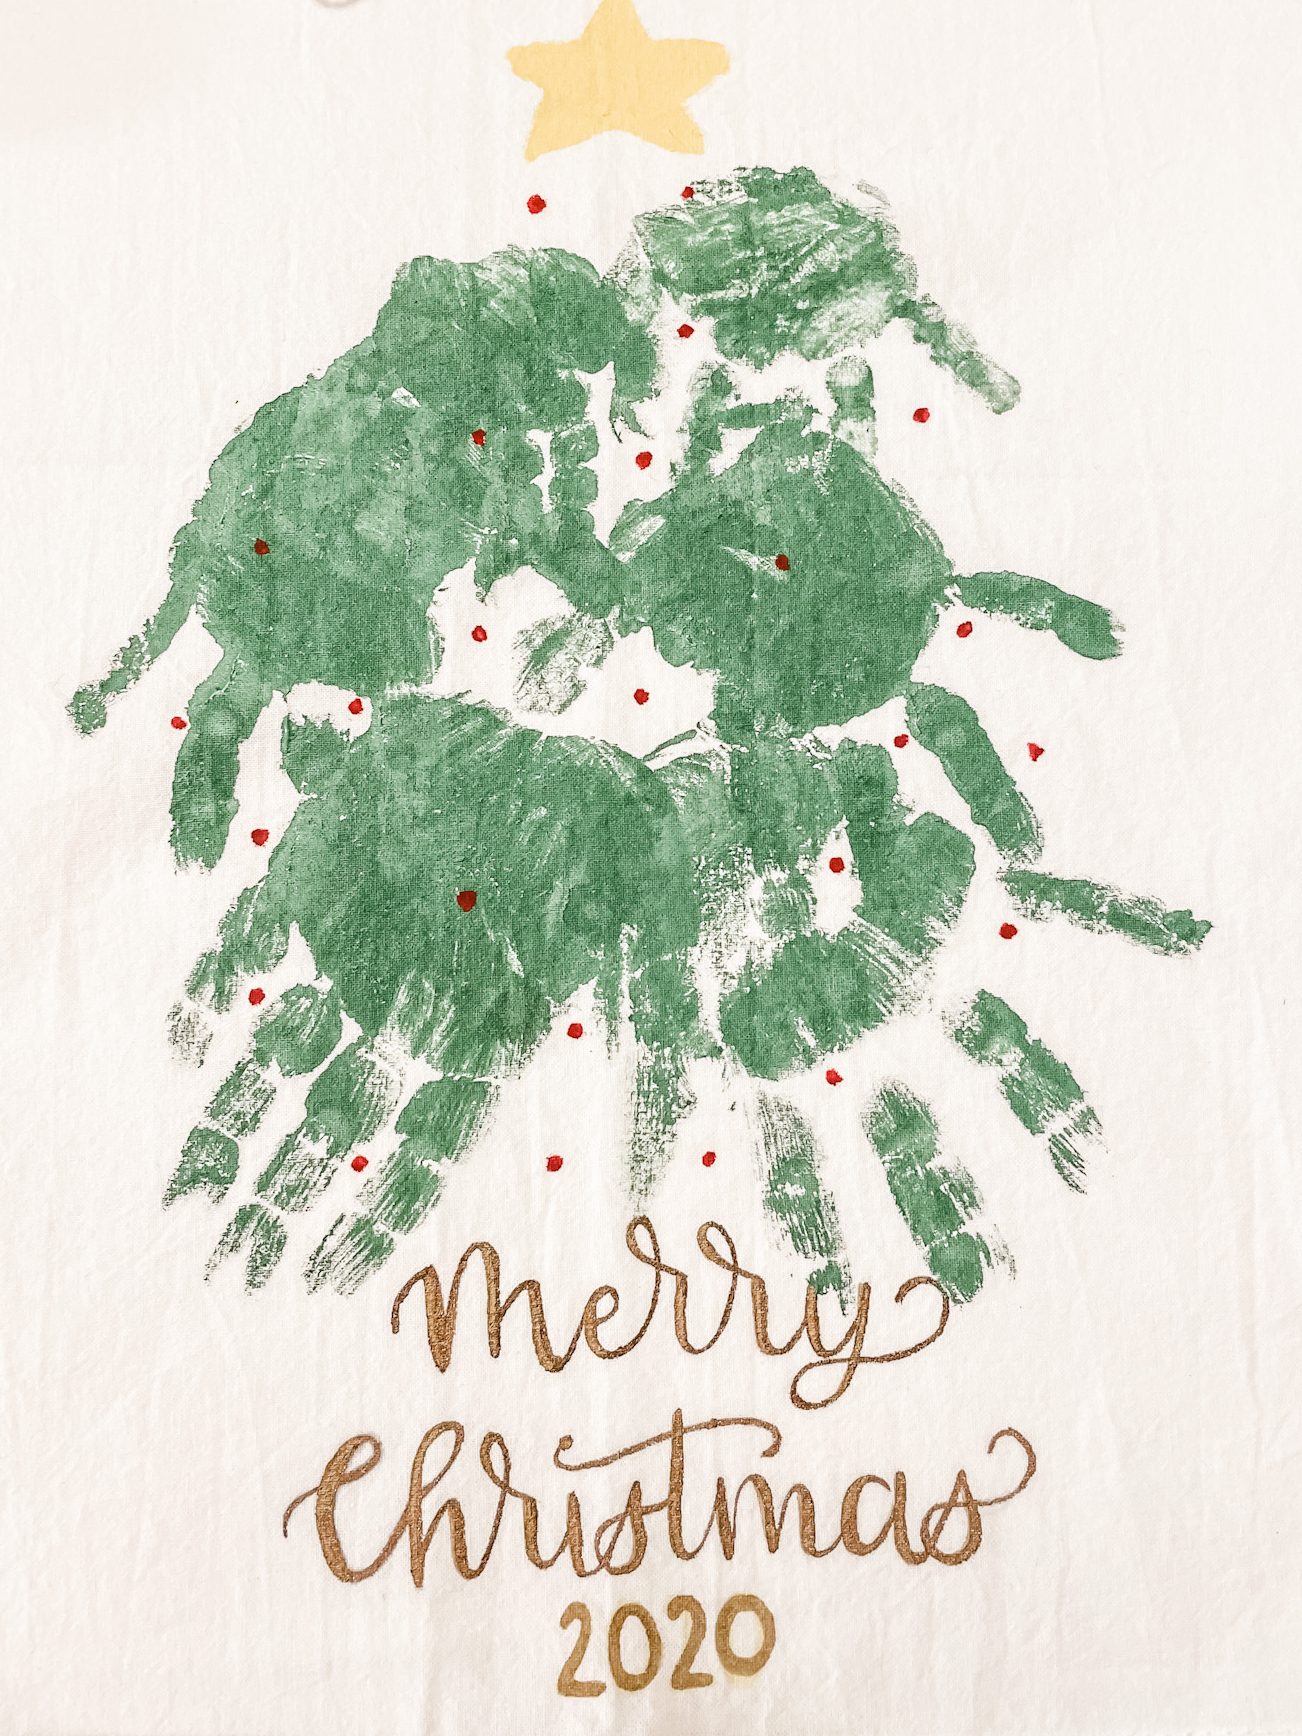
Handprint Christmas Trees
These are super fun, and probably the best one on the list because you can use anything. I mean, ANYTHING. For this one below we used icing and sprinkles leftover from decorating gingerbread cookies (just write inside, “Hope your Christmas is merry sweet,” how crafty are you!?) You can use paint, too, you can stamp on paper, hand towels or a tea towel for a unique gift that’ll last year after year, I mean truly–the possibilities are endless.
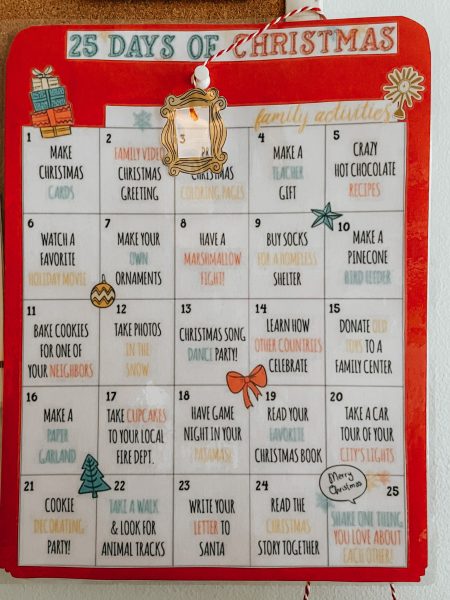
25 Days of Christmas
For the bored or crafty parent, or maybe the bored and not crafty, I found this chart on Pinterest. I honestly can’t find the link, if I do I’ll update it here, but here’s a picture of what I printed and hung in our school room. I ended up just laminating and using a dry erase marker to check off the ones we did without feeling the pressure to go in order. This year our December has been warm, so playing in the snow isn’t something we can check off. Due to all the various limitations in place due to Covid, we aren’t doing things like teacher gifts, local fire dept drop offs, etc. But it was a fun checklist to use if we needed an activity for the day. We can reuse it for next year, too!
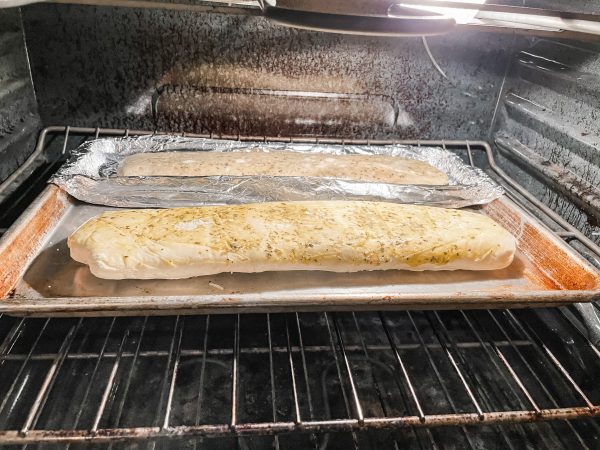
Stromboli (affectionately, ‘bolis)
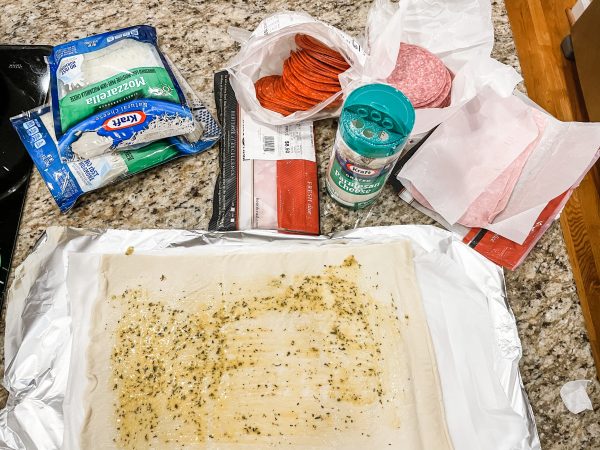
Without further ado, here is one of our favorite recipes! I buy the premade pizza dough in rolls for my husband and kids, but you can get fancy and make your own dough, too. (Since I have celiac disease, I do use Bob’s Red Mill gluten free pizza dough mix, it makes two ‘bolis and the instructions are super easy on the bag!)
INGREDIENTS:
- 1lb each of hard salami, pepperoni, lunchmeat ham
- 1 bag of shredded mozzarella cheese
- 2-4 pizza dough balls or rolls (premade, seriously, make your life easier)
- 3 egg yolks
- 3 TB each Italian seasoning, grated parmesan cheese, oil
- 1 tsp garlic powder
- wax paper or parchment paper
- aluminum foil
STEPS:
- Unroll dough onto parchment paper or wax paper.
- Mix egg yolk, oil, parmesan cheese, Italian seasoning, garlic powder into a spreadable paste (add more oil as necessary to thin it out) and spread over the dough.
- Spread slices of salami.
- Spread slices of pepperoni.
- Sprinkle mozzarella cheese throughout.
- Cover with 3-4 slices of ham.
- Roll lengthwise.
- Paint top of ‘boli with that yummy paste.
- Wrap in wax paper or parchment paper. Wrap that with foil. Write the date and freeze that sucker!
- When you’re ready to bake, unwrap from foil AND paper and bake on a cookie sheet at 400-425 for 15-30 mins whether fresh or frozen (until golden brown on top). Temp depends on your dough, don’t forget to read the package. I’m not a chef!
- Serve with ranch dressing or pizza sauce.